How To Set Up A Small Space Greenhouse
How To Set Up A Small Space Greenhouse is a question many urban gardeners and small-yard growers are asking as they look to extend their growing season and make the most of limited square footage. Whether you’re working with a balcony, patio, or a tiny backyard corner, setting up a compact greenhouse doesn’t have to be complicated or costly. With a bit of planning, the right materials, and an understanding of light, ventilation, and shelving, you can create a thriving environment for herbs, vegetables, and flowers year-round. In this guide, we’ll walk you through the essential steps to turn any small space into a productive, climate-controlled growing zone.
Setting up a small greenhouse in my backyard totally changed how I garden. If you’ve thought about growing your own plants all year but don’t have a ton of space, a compact greenhouse is a smart way to give your backyard a boost. Even with a small footprint, there’s plenty you can do to grow veggies, herbs, and flowers in a setup that easily fits behind your house or next to the garage.
I started my small greenhouse after getting tired of losing fragile seedlings to surprise cold snaps and unpredictable weather. Having a dedicated space for plants, sheltered from the elements, felt like a luxury at first. But with the right setup, it’s honestly pretty easy and way more doable than you might think.
Common Greenhouse Frustrations (and How to Dodge Them)
The biggest headaches I ran into weren’t really about building or buying the structure. It’s usually the details that get overlooked, like poor airflow or putting the greenhouse in a shady spot. Some issues pop up more often than others:
- Trying to cram too many plants or supplies into a small area
- Poor greenhouse placement that blocks the sun
- Lack of storage or shelving leading to clutter
- Letting the inside overheat or get too humid
These problems are easy to solve with planning. Getting the basics right makes everything run smoother, so here’s what worked for me.
How To Set Up A Small Space Greenhouse
A small greenhouse can be anything from a compact walk-in tent to a sturdy glass structure. I went with one of the popular polycarbonate kits, but you can find plenty of portable fabric options or even build your own frame with PVC pipes and clear film — it depends on your budget and style.
- Pick the right size: Measure your backyard and jot down how much space you’re comfortable using. Even 4×6 feet is plenty for a solid mini greenhouse.
- Choose your frame: Wood and aluminum are popular because they’re durable and easy to assemble. For something lighter, PVC works great for DIY builds.
- Covering material: Clear polycarbonate panels block out cold but let in tons of light. Heavy-duty greenhouse film is cheaper and easy to work with, though it needs replacing over time.
- Ventilation: Make sure your greenhouse has vents or windows you can open to let out excess heat and humidity. Small fans help too.
- Foundation: You can build right on the ground but adding gravel or bricks underneath really helps drainage and keeps mud under control.
Many greenhouse kits come with clear instructions and basic hardware, so putting one up over a weekend isn’t tough. Having a friend to help with bigger panels or heavy lifting makes things smoother.
You don’t have to splurge to get started. Thrift stores or online marketplaces often have used greenhouses or materials at a bargain, so if you’re on a budget, check for deals before buying brand new. Even with basic supplies, you can put together a backyard oasis that feels custom and fits your needs.
As an Amazon Associate, I earn from qualifying purchases
![]()
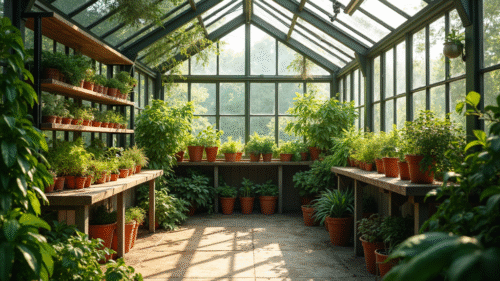
How To Organize A Small Greenhouse For Maximum Use
Keeping things organized in a small greenhouse is all about using your space wisely. I added simple metal shelves along the walls and hung baskets from the roof for lighter tools. Here’s what worked for me:
- Use vertical space: Stack pots on tiered shelving or install hanging racks for tools and smaller trays.
- Portable benches: Folding tables or lightweight benches are easy to move around or take out if you need extra plant room.
- Clear labels: Marking trays and pots saves me from guessing what I planted where — especially when seedlings start to look alike.
- Dedicated tool caddy: Keep pruners, gloves, a spray bottle, and ties in one spot so you’re not scrambling each time you need something.
Arranging plants by height and light needs helps a lot. I keep taller veggies in the corners, so they don’t block out sun from the shorter trays or seedlings near the door. Keeping your workspace tidy saves time and helps you spot problems like droopy leaves or pest issues fast.
Seasonal organization is also key. I rotate trays and supplies each season depending on what I plan to grow, which keeps things flexible and prevents the area from getting cluttered. Having a small bin for seed packets, markers, and watering cans keeps essentials handy and prevents lost time searching for tools during busy planting periods.
Best Position For A Small Greenhouse
Getting the right spot for your greenhouse is super important. The goal is to catch morning sun and keep your plants from getting scorched during summer afternoons. Here’s what I learned about placement:
- Find a south or southeast facing area. This gives the greenhouse nice even light throughout the day and helps warm things up early.
- Watch for shade from fences or trees. Even in winter, blocked sunshine will slow plant growth. Trim branches or move the greenhouse away from tall objects if you can.
- Avoid low, soggy spots in your yard. Damp areas can lead to humidity issues and rot inside the greenhouse.
- Keep it near a water source. Having a hose nearby or a rain barrel makes watering a whole lot easier.
A little extra planning at this stage pays off. I once set up a quick lean-to against a fence and lost two trays of lettuce because the afternoon shade totally blocked the light. After moving things, everything perked right back up.
Where To Place A Greenhouse In Your Yard
Picking the right spot in your backyard depends on what you grow and how often you’ll use the greenhouse. Some tips I found helpful:
- Visibility: Place it where you’ll see it often. Out of sight usually means out of mind, and forgotten plants dry out fast.
- Accessibility: Easy access to pathways and the main garden makes moving plants or tools less hassle.
- Protection from wind: If you have harsh winds, tuck the greenhouse next to a fence or hedge for a bit of shelter.
- Level ground: A flat spot cuts down on build time and stops trays or benches from wobbling.
Having my greenhouse close to the kitchen makes quick herb harvesting or plant checks part of my regular backyard routine. It’s a small detail that keeps gardening fun and easy to stick with. If you’re limited on options, even a clear windowed porch can work as a mini greenhouse space.
Features To Add For Even Better Results
- Automatic vent openers: These gadgets pop the vents open if things get too hot, which is super handy if you’re not home.
- Thermometer and humidity gauge: Cheap to add but really helpful for keeping the environment just right.
- Grow lights: If you want to start seeds in winter, a couple of LED grow lights do the trick until real sunlight peaks through again.
- Shelving kits: Premade shelves designed for greenhouses are sturdy and simple to install.
These extras don’t cost much but make greenhouse gardening feel way more pro. If you want to check out even more ideas on greenhouse organization or small space gardening, the Gardener’s Supply Company resource is pretty helpful, and there’s a huge community of backyard gardeners sharing creative tips all over YouTube and gardening forums.
Other bonus features to consider include water timers, solar-powered fans for extra cooling on hot days, and reflective foil or insulation to help hold in warmth during cold snaps. Tailor your setup to your climate and plant needs for the ultimate growing environment, and swap things in and out as you gain more experience each season.
Ready To Start Growing?
- Small greenhouses are quick to set up, even on a tight budget.
- Organization and smart placement help you get the most out of your space.
- A little planning in the beginning leads to healthier, happier plants all year long.
Once you have everything in place, growing your own fresh produce gets a lot more satisfying. Even if you’re new to gardening, a small greenhouse makes experimenting low-risk and way more rewarding. I found this step-by-step guide from the University of Minnesota Extension really helpful for troubleshooting as I went along.
Wrapping up, a small greenhouse might seem like a weekend project, but its impact on your gardening is huge. With a little thought and some creative tweaks, you can keep your plants happy, your setup organized and enjoy year-round growing right in your own backyard. Start small, make adjustments as you go, and you’ll likely be wondering why you waited so long to put up one of your own.
✅ **Conclusion:
Setting up a small space greenhouse is a rewarding project that can transform even the tiniest area into a thriving growing environment. But success starts with a solid foundation of knowledge. Before you begin, take a moment to review our small-space greenhouses introduction to understand the key principles. Make sure to choose the right size for your greenhouse and select the best materials for your structure. Having the essential gardening tools on hand will make the setup process smoother, and planning for proper ventilation is critical to plant health. Once your greenhouse is in place, consistent maintenance will help it serve your garden for seasons to come. With the right preparation and care, your compact greenhouse can be a year-round source of fresh, homegrown produce and greenery.
Let’s grow something great!
Don’t forget the shed for your gardening tools…

Leave a Reply